1. Create your first menu
- Open Studio and sign in with Google using your Developer account. Select Sandbox in the environment selector.
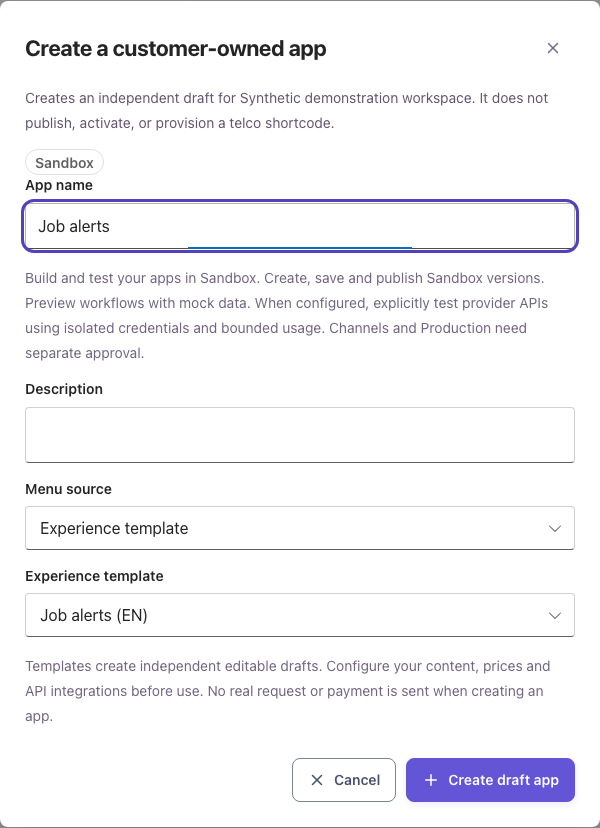
- Choose Create app. Give the app a clear name, then select Experience template as the menu source.
- Choose an English (EN) or French (FR) starter and create the draft app. You receive your own editable copy; changing it never changes the catalogue or another app.
- Choose Open workspace, then Menu Studio. Your template draft opens automatically. Use Saved drafts to load another saved draft.
- Read the messages and follow each branch before editing. Decide what your customer should be able to complete, cancel or exit.
Available starters: Job alerts, Customer support request, Appointment request, Order status lookup, Offers and subscriptions, and Utility bill payment. Each is available in English and French.
The language buttons change the interface and this guide, not the messages you author. Choose the appropriate template language and write customer-facing text in that language.
2. Find your way around the canvas
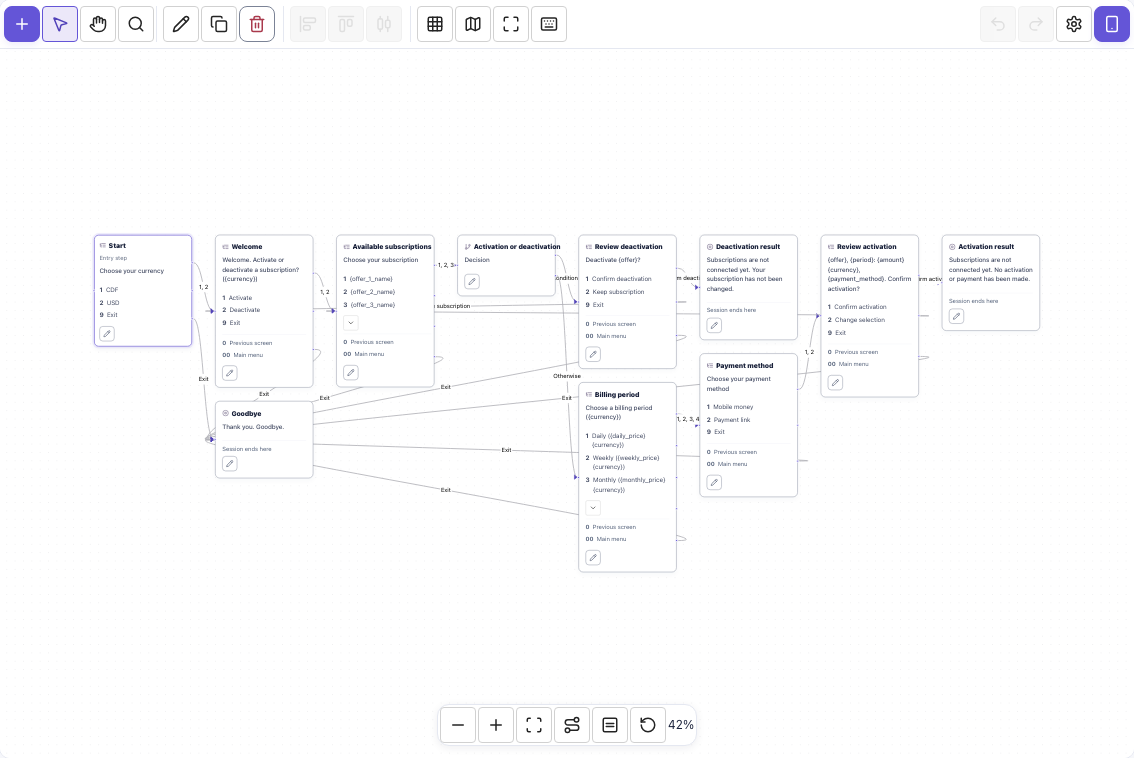
The canvas shows steps and their routes. Each step has a type icon before its name. The entry marker identifies where a conversation starts; it is not a sixth node type.
Studio opens in Fit view. The entry step does not offer Back (0) or Main menu (00); these shortcuts are available on later steps when enabled.
- Use the add-step control to choose a node type. Give every step a meaningful name, such as Welcome, Choose offer or Review request.
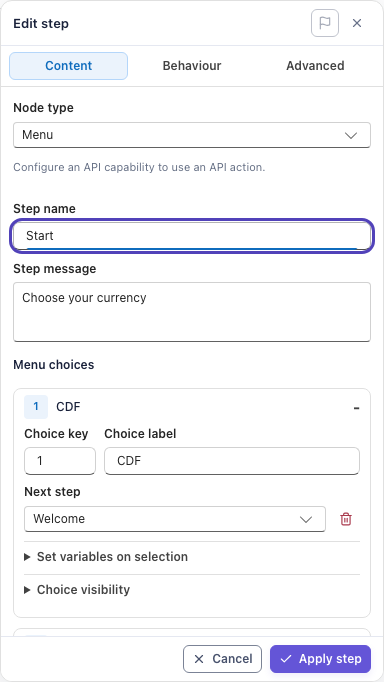
- Open Edit step to change its Content, Behaviour or Advanced settings. Step name is your design label; Step message is what the customer reads.
- To change an existing node, use Node type in Edit step, review the warning and choose Change node type. Configure its new fields and routes, then Apply step. Incoming connections and position stay in place; Undo canvas change restores the previous type and settings.
- Choose Apply step to apply an edit to the working draft. Closing the editor without applying does not save that editor text.
- Use Set as entry step on the intended first step. Moving a card changes its position, not the route or entry point.
- Fit view frames the whole flow. Focus selected routes follows the selected step and its connected routes. Manual pan or zoom exits those modes; editing a step keeps your manual framing.
- Use search to find a step in a large menu. Hover or focus the canvas controls to read their tooltips; names remain available when controls use icons.
3. Choose the right node
Menu
Display a message and numbered choices. Use it for Welcome, offer lists, periods and review screens.
Changing type replaces incompatible choices, conditions or API mappings. API action requires a configured capability. To change the shared Goodbye node, first choose another End step for shared Goodbye in Flow settings.
Collect an answer
Ask for one typed answer, save it to a variable and continue. Use it for a reference, a description or a preferred date.
Changing type replaces incompatible choices, conditions or API mappings. API action requires a configured capability. To change the shared Goodbye node, first choose another End step for shared Goodbye in Flow settings.
Decision
Compare an existing variable with a value and choose a route. The customer does not need to choose the branch.
Changing type replaces incompatible choices, conditions or API mappings. API action requires a configured capability. To change the shared Goodbye node, first choose another End step for shared Goodbye in Flow settings.
API action
Call a configured capability with mapped inputs and route its outputs. Adding this node alone does not connect an API.
Changing type replaces incompatible choices, conditions or API mappings. API action requires a configured capability. To change the shared Goodbye node, first choose another End step for shared Goodbye in Flow settings.
End session
Display the final message and close the conversation. Use an honest result, a cancellation or a safe unavailable message.
Changing type replaces incompatible choices, conditions or API mappings. API action requires a configured capability. To change the shared Goodbye node, first choose another End step for shared Goodbye in Flow settings.
4. Write choices and connect routes
- Edit a Menu step. Enter a short Step message, then expand a choice.
- Set Choice key to the input the customer sends, and Choice label to its meaning. For example: key 1, label Activate.
- Select Next step for that choice. A choice marked Not connected is not a working route. Connect every choice you want customers to use.
- Add the remaining choices and Apply step. Numeric keys are sorted numerically: 1, 2, 10, not 1, 10, 2.
- You can also connect compatible canvas handles. Reopen the step to verify the intended destination, especially when several branches reach the same card.
Use shared navigation and each step's Behaviour settings for Back, main-menu return and exit behaviour. Check inherited settings before creating extra navigation choices. Test navigation after collecting answers: returning to a menu should not accidentally submit the same action twice.
5. Reuse shared variables
Open Flow settings > Variables. Shared variables hold values for one conversation: currency, the selected offer, a reference or an API result. Define the type and default, apply each value, and save the draft. A default is not shared customer state across conversations.
- Use a string for references, phone numbers and values with leading zeroes. Use a numeric or boolean type only when the value really has that meaning.
- In a choice, assign a fixed value or copy another variable. For example, choosing CDF sets currency to CDF; choosing an offer can copy offer_1_name into offer.
- Use {offer} or {currency} in messages and choice labels. The name inside braces must match an existing variable. For older imported flows, use Activate shared variables before relying on interpolation.
- Keep API tokens, passwords and other credentials out of defaults, menu messages and JSON examples. Store restricted test credentials only in the dedicated connection form.
Offer: {offer}. Period: {period}. Amount: {amount} {currency}. Confirm?Paste this into Step message, not into the JSON importer. Define offer, period, amount and currency first; keep the variable names inside single braces unchanged.
6. Collect and check answers
- Create the answer variable in Flow settings > Variables before wiring the collection step.
- Add Collect an answer. Write one clear question and select Save answer to variable.
- Choose Next step. Review the variable's type and the step's Behaviour settings for validation and retry behaviour.
- Apply step, then try a valid answer, an empty or invalid answer, and Back or exit in the simulator. Use synthetic data, not real customer secrets.
Collecting text is not the same as verifying it. A typed date does not reserve an appointment; an order reference is not proof of ownership. Connect an authorized API when your service needs verification.
7. Route with a decision
Add a Decision, choose a Variable, enter the typed Equals value and select its Next step. Add other conditions as needed, and always set Otherwise to a safe destination. Matching cases are evaluated in order; Otherwise handles unmatched values.
For example, route request_kind = deactivate to a deactivation review and use Otherwise for activation. For an order lookup, branch on the mapped API status, not on a success message you wrote yourself.
8. Connect your API
- Get the API owner's permission, public HTTPS test endpoint, OpenAPI definition and restricted test credentials. Confirm what the test operation can change.
- Open Flow settings > Integrations > Import OpenAPI. Import a supported operation, review its required inputs and outputs, and apply the capability changes.
- Configure and save the connection for that endpoint. On the self-service Sandbox path, explicitly confirm that you are authorized to test this API. Private or reserved addresses are not supported by this public HTTPS path.
- Create variables for the inputs and outputs you need. Add or edit an API action and choose its API capability.
- Map every required API input to the appropriate variable. Check required references and values collected earlier in the journey; an unmapped required input blocks testing.
- Map response outputs to your flow variables and set Success, Failure and any output-dependent routes. Include an honest unavailable or not-found destination.
- Configure action confirmation where required. A review Menu is useful, but it does not replace the real-action consent required by Sandbox API testing.
- Apply the edits, Validate experience, Save draft and publish a Sandbox version before testing the full real workflow.
Importing an operation describes an API contract; it does not prove that the endpoint is reachable or that authentication works. Saving a connection or credentials does not send an API request.
Worked API example: order status
This minimal, read-only OpenAPI example is importable in Studio. api.example.com is a placeholder, not a working demo server. Replace it with an authorized public HTTPS test endpoint and adapt the contract and authentication to your API before testing.
Download the OpenAPI example (JSON)
View the importable OpenAPI example
{
  "openapi": "3.0.3",
  "info": {
    "title": "Synthetic order-status API",
    "version": "1.0.0"
  },
  "servers": [
    {
      "url": "https://api.example.com"
    }
  ],
  "paths": {
    "/orders/{reference}": {
      "get": {
        "operationId": "lookup_order_status",
        "summary": "Look up a synthetic order status",
        "parameters": [
          {
            "name": "reference",
            "in": "path",
            "required": true,
            "schema": {
              "type": "string",
              "minLength": 1,
              "maxLength": 64
            }
          }
        ],
        "responses": {
          "200": {
            "description": "Synthetic status for the requested reference",
            "content": {
              "application/json": {
                "schema": {
                  "type": "object",
                  "additionalProperties": false,
                  "required": [
                    "status"
                  ],
                  "properties": {
                    "status": {
                      "type": "string",
                      "maxLength": 32,
                      "enum": [
                        "pending",
                        "shipped",
                        "not_found"
                      ]
                    }
                  }
                }
              }
            }
          }
        }
      }
    }
  }
}curl --request GET \
'https://api.example.com/orders/DEMO-1042' \
--header 'Accept: application/json'{
"status": "shipped"
}Map the request and response
Create string variables reference and order_status. Collect a synthetic reference such as DEMO-1042, import GET /orders/{reference}, then configure these mappings on the API action:
| Direction | API field | Flow variable |
|---|---|---|
| Input | reference | reference |
| Output | status | order_status |
After Success, add a Decision on order_status: shipped shows the shipped result; pending shows a pending result; not_found shows an honest not-found message. Route Otherwise and API Failure to a safe unavailable message. Never treat a failed request as an order confirmation.
9. Test the whole journey
Phone simulator: safe menu testing
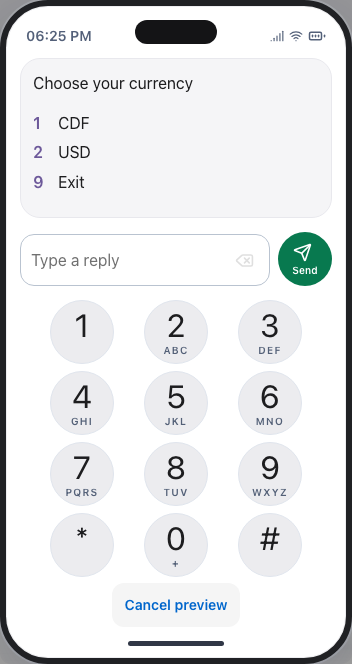
Open Simulator and Start preview. Enter each choice key or collected answer, then continue. Exercise success, failure, invalid input, Back, main menu, cancellation and exit. The ordinary phone simulator uses simulated responses; it does not test your real API authentication or execute a payment.
Real API testing: authorized end-to-end execution
- Open Applications & Actions and find Sandbox API integrations. Save the API's isolated test credentials in its credential form, never in the menu.
- Return to Menu Studio > Real API testing. Choose the saved integration and the published Sandbox version you want to exercise.
- Run preflight and resolve connection, contract or input errors. Walk through the menu and inspect the mapped result at every API action.
- Explicitly confirm each real action. Test against a provider sandbox with bounded test data; a Sandbox request can still change the external system.
- For a multi-action flow, check that the first response supplies the next action's inputs. Also test authentication failure, not-found results and safe cancellation.
The public HTTPS Sandbox path cannot call localhost or private-network APIs. Those need a separately qualified connection. Publication, a successful API test and carrier or WhatsApp activation are separate approvals.
10. Build an offers and subscriptions menu
Start with Offers and subscriptions. Keep one list of actual items, not separate Offer, Bundle and Service category screens. The starter already separates activation from deactivation.
- Choose currency
- Welcome
- Choose an offer
- Choose a period
- Choose payment
- Review
- End session
- In Flow settings > Variables, edit offer_1_name, offer_2_name and offer_3_name to your own offers, bundles or services. The same names appear in the list and review.
- Set your CDF and USD daily, weekly, monthly and annual prices. These shared period prices apply to all three items. For different item prices, duplicate the period step and give each item its own route and price variables.
- Keep the first Menu as currency selection. Welcome offers Activate, Deactivate and the configured exit navigation.
- Activation goes through the item list, billing period, payment method and review. Display the selected offer, period, amount and currency before confirmation.
- Deactivation goes from the item list to its own confirmation, without requesting a billing period or payment.
- Keep the starter's not-connected result until you add and qualify your real subscription or payment API. Selecting Mobile Money is not a payment transaction.
- Apply each change, save a named draft, then simulate both currencies and both activation and deactivation paths, including cancellation.
11. Save, validate and publish
- Apply step commits editor changes to the working canvas. Apply or cancel pending capability changes in Flow settings as well.
- Validate experience checks the flow and its contracts. It does not certify external API reachability, credentials or provider approval.
- Enter a Draft title and choose Save draft for permanent server storage. Save regularly, then reload the saved draft to confirm you selected the intended revision.
- Choose Publish and review the publication confirmation. Publishing requires this workspace's Developer account and publication permission; resolve validation errors first.
- A published version is immutable. Further changes belong in a new draft and require a new publication. Use Versions / Audit to inspect publication history.
- Publishing in Sandbox does not put a service live. Production access, promotion, channel binding, provider and commercial approval remain separate. Contact Servinexa for your launch.
Applied working changes can recover after session expiry and signing in again in the same browser tab for up to 24 hours, only after the same author, workspace and application are authorized again. Unapplied editor text, credentials and simulator state are not recovered. Explicit sign-out or confirmed discard clears recovery. This is not a replacement for Save draft.
12. Review before handover
- Every intended choice reaches the right next step; every branch can finish, cancel or exit without a dead end.
- Messages are short, clear and in the customer's language. Choice keys are unique and review screens show the actual selected values.
- Required variables have the right types, defaults and API mappings. Currency, amount, item and period remain consistent when navigating back.
- Valid, invalid, not-found, API failure and declined-confirmation paths have all been tested. Multi-action workflows use actual preceding outputs.
- No credentials or real customer secrets appear in prompts, defaults, screenshots or shared examples.
- The named draft and intended immutable version are saved. The handover distinguishes simulated results, authorized Sandbox API results and approved Production availability.
13. Troubleshoot common problems
My changes disappeared.
Check whether you used Apply step and Save draft, and whether Saved drafts points to the right revision. Recovery does not include unapplied editor text or replace a permanent save.
Save or Publish is disabled.
Resolve validation issues, apply or cancel pending Flow settings edits, enter a draft title for saving and check your account permissions. A conflicting revision should be reloaded and reviewed, not overwritten blindly.
A choice cannot be selected.
Check its Next step and any condition. Not connected choices are not working routes; a condition may hide a choice until its variables have the expected values.
An API action has no usable result.
Check the selected capability, all required input mappings, output mappings and failure route. Then use Real API testing to check the saved connection and restricted credentials; the phone simulator is not a real authentication test.
My API is rejected before execution.
Use an authorized public HTTPS test endpoint. Localhost, private or reserved addresses and unsupported contracts are not admitted by this public path. Resolve preflight errors rather than weakening network or credential checks.
An action outcome is unknown.
Do not repeat a payment or another write just to get a clearer message. Keep the test reference, check the provider result and reconcile the outcome before trying another action.
The Overview says USSD is not configured.
The installation has no configured USSD usage service. This does not prevent menu design or phone simulation, and it must not be interpreted as measured zero traffic or an activated carrier.
I published, but the service is not live.
Publication saves an immutable version; it is not Production or channel activation. Check the selected environment and ask Servinexa to qualify the intended service, provider and launch approvals.
Build one useful journey first.
Start with a template, make one change, save it and test every route. Add real integrations only when the menu works and you are authorized to exercise the API.
Open Menu Studio